RAIN CITY CAMERA SUPPORT
VANCOUVER'S SOURCE FOR COLLAPSIBLE CAMERA CARTS
(604) 816-9169
52" CART ASSEMBLY INSTRUCTIONS
Step by step instructions are found below

STEP 1
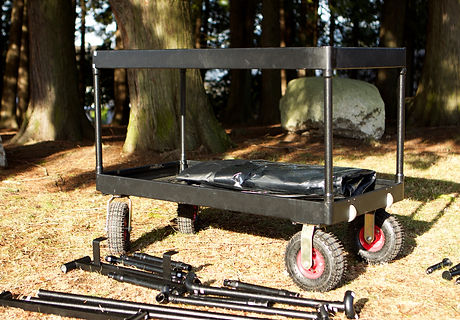
With the cart upside down, use an allen key to remove the four bolts from the large corner pins and then remove the bottom cart shelf from the top shelf.

STEP 2
Remove all parts from the inside of the cart.

STEP 3
Turn the bottom shelf upside down (the shelf with the caster mounts on it).

STEP 4
Slide the 10" rigid caster wheels into the caster mounts at the same end of the cart as the luggage wheels.
Slide the 10" swivel caster wheels into the caster mounts at the opposite end of the cart.
Install the 4 caster locking bolts and flip the bottom shelf over onto its wheels.

STEP 5
Note: Ensure all set screws on the cart are backed off using a 5/32" allen key. Avoid tightening all set screws until the entire cart and roof frame are assembled, then tighten all set screws. Assembling the entire cart before tightening anything is much easier.
Insert four corner posts in the lower shelf. They are labelled "A".

STEP 6
Install the top cart shelf on the four corner posts and ensure it drops down on all corners until it bottoms out on the post collars below.
STEP 7
Insert four posts, labelled "B", into the four corners of the top shelf. If these posts don't sit flush in the corner hole, flip them upside down.

STEP 8
Insert the tripod holder on top of the posts at the end of the cart that has luggage wheels. The hooks should face the outside of the cart.
Insert the H shaped piece at the opposite end of the cart on top of the other two posts. The H shaped piece is the piece that looks just like the tripod holder but without the tripod hooks.
Note: It's possible to insert the optional Mitchell Mount accessory instead of the H shape piece for rubber head storage on this cart.

STEP 9
Install the remaining posts labelled "C" and "D" on top of the tripod holder and on top of the H shape piece. Refer to the photo here and the labels on the posts for the proper positioning. The longer posts will be at the front of the cart. The front of the cart is the side you will be looking at if the push handle is on your right hand side.

STEP 10
Note: At this point it's easiest to assemble the remaining roof pieces on the ground separate from the cart before installing the entire roof assembly on the cart.
Match the labels on each 3-way corner piece with the labels found on the remaining straight pipes. These labels read "J" and "K".

STEP 11
Tighten the set screws on all roof joints and then lift the roof assembly onto the cart.
Note: If things aren't aligning properly when installing the roof assembly on top of the cart, loosen whichever set screws may need loosening in order to twist the 3-way corner pieces to match them up with the vertical posts.

STEP 12
Now that the entire cart is assembled, use a 5/32" allen key to tighten all set screws. This will create a very sturdy cart.

STEP 13
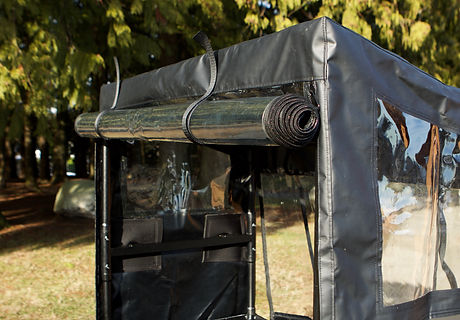
Unfold the rain cover and install on top of the roof of the cart ensuring the high side of the roof aligns with the high side of the rain cover.

STEP 14
Rip open the vertical velcro strips under the push handle and feed the centre portion of black vinyl behind the push handle.

STEP 15
You can roll up the front and back panels of the rain cover as needed and secure the roll with the velcro straps which are found at the top of the rain cover.